1 Description
[hide]
Star Spike Protection Mask creates a full-size grayscale mask that protects bright stars and their diffraction spikes. It uses the image's luminance to follow the shape and brightness of the cores and spikes. The source image is read without changing its pixels.
Black protects the target from processing; white allows processing; gray gives partial protection. Apply the result with masking enabled and Invert Mask OFF.
Use PixInsight 1.9.5 with the V8 scripting engine and a stretched stars-only RGB or grayscale image. The detector is intended for roughly straight spikes on two perpendicular axes. The saved mask is a single-channel, 32-bit floating-point XISF with the source image's dimensions and orientation.
2 Parameters
[hide]
2.1 Minimum bright-core area (px)
Group: Star selection. Default: 100. Range: 1–10000 whole pixels.
The main lower limit for choosing stars. It counts connected pixels above Core luminance threshold after slight smoothing. Increase it to select fewer, larger bright cores; decrease it to include smaller ones. It is a size-based brightness measure, not a stellar magnitude. Changing this value does not expand the mask of a star that remains selected.
2.2 Core luminance threshold
Group: Star selection. Default: 0.60. Range: 0.0001–0.9999.
The luminance level used to define a bright core. Lower it when the actual image samples are too dark for stars to qualify. Changing this threshold also changes measured core areas, so review the minimum-area setting afterward. ScreenTransferFunction (STF) is a display stretch and does not change these measurements.
2.3 Required spike arms (0 = any)
Group: Star selection. Default: 2. Range: 0–4 whole arms.
The number of detected arms a star must have to qualify. Two accommodates many asymmetric or partly clipped stars. Three or four makes selection stricter. Zero admits qualifying stars without spikes; those stars receive core protection.
2.4 Minimum luminance contrast
Group: Spike detection. Default: 0.025. Range: 0.0001–0.3.
The minimum signal above local background for core wings and spike profiles. Raise it to tighten protection and reject faint structures; lower it to include fainter wings and spikes. Local noise can impose a higher effective cutoff. This setting can change both the profile and which stars qualify.
2.5 Measure spike angle automatically
Group: Spike detection. Default: On. Range: On or Off.
Estimate the shared spike direction from bright stars, then refine it for individual stars. Turn it off to enter a manual direction.
2.6 Spike-axis angle (degrees)
Group: Spike detection. Default: 0. Range: 0–90 degrees.
Manual direction of one spike axis, measured clockwise from the image's horizontal axis. It is used only when automatic angle measurement is off. Either of the two perpendicular axes can be specified.
2.7 Maximum spike length (px)
Group: Spike detection. Default: 600. Range: 30–3000 whole pixels.
The maximum distance searched from a star's center along each arm. Increase it if the console reports that spikes reach this limit. It is a search limit, not a growth control: increasing it has no effect when the measured spikes already end sooner.
2.8 Core radius (%)
Group: Mask settings. Default: 100. Range: 10–200 percent.
Scale the luminance-shaped central profile. At 100 percent it uses the measured extent; 60 percent makes it smaller. The effect is confined to the core profile, leaving the measured spike arms in place. Protection within the footprint follows luminance rather than forming a uniformly black disk.
2.9 Grow protected area (px)
Group: Mask settings. Default: 0. Range: 0–12 whole pixels.
Expand all existing protection around cores, spike sides and spike tips by a circular radius. Zero disables growth. Start with 2 or 3 pixels. Gray protection levels are retained, the selected-star count does not change, and nearby protected regions can merge. Growth is applied before whole-mask blur.
2.10 Whole-mask blur sigma (0 = off)
Group: Mask settings. Default: 0. Range: 0–25 pixels.
Gaussian smoothing of the completed mask. Zero disables blur; 2 pixels is a useful starting point when additional softness is wanted. Sigma is the Gaussian standard deviation. Blur spreads transitions and can turn narrow black spikes gray, reducing their protection. It does not select more stars or provide an exact growth distance.
2.11 Offer to save the result as XISF
Group: Mask settings. Default: On. Range: On or Off.
Show a save dialog after interactive mask creation. If disabled, save the generated image with File > Save As. Cancelling Save leaves the mask available. Choose a destination different from the source image.
3 Usage
[hide]
1. Open your stretched stars-only image and launch StarSpikeProtectionMask from Script > TG Scripts.
2. Select the source image in the list at the top of Settings. Begin with the default values and leave whole-mask blur at 0.
3. Click the magnifier to update the preview. Read the selected-star count and inspect the mask at 1:1.
4. Adjust Minimum bright-core area to include fewer or more stars. Update the preview after each change.
5. Adjust Core radius to change only the central profiles. To expand protection around both cores and spikes, try Grow protected area = 2 pixels. Add blur only if you want softer transitions.
6. Click the green checkmark to create the mask. Save the XISF when prompted. Cancelling the save dialog leaves the generated image open.
7. Assign the generated image as a mask to the matching target, enable masking and leave Invert Mask OFF. Inspect the mask overlay before applying your image process.
4 Installation
[hide]
Extract the supplied archive to a permanent location. Keep the TG Scripts folder intact, including StarSpikeProtectionMask.js, doc/ and rsc/. In PixInsight, choose Script > Feature Scripts > Add and select that TG Scripts folder. Finish registration, then run Script > TG Scripts > StarSpikeProtectionMask. The documentation icon opens the bundled help.
5 Interface and symbol buttons
[hide]
6 Preview and source comparison
[hide]
Update preview calculates the complete mask with the current settings, including growth and blur. Use the viewer's zoom controls for fit-to-window and 1:1, the mouse wheel to zoom, and dragging to pan. Inspect narrow spikes at 1:1. Show source image for comparison switches between the original RGB or grayscale image and the mask while retaining the viewing scale and position. The source display does not apply STF.
Changing a setting or the source clears the preview. Click the magnifier to calculate it again; slider changes do not trigger continuous processing. The status line reports the number of selected stars. Previewing creates no permanent mask image. The display is an 8-bit bitmap, while Create mask produces full-precision Float32 output and rereads the source.
7 Adjust mask size
[hide]
A practical starting sequence is: select stars with the area and detection controls; inspect the luminance profiles with Core radius at 100, growth at 0 and blur at 0; adjust the core size if necessary; add 2 pixels of growth; then add modest blur only if needed. Refresh and inspect after each step.
A growth radius of 2 pixels expands a long straight spike by approximately 2 pixels on each side, making it about 4 pixels wider. The operation uses a circular footprint on the pixel grid and is clipped at image boundaries. Because black is the protected region, the corresponding operation in MorphologicalTransformation is Erosion of this mask, or Dilation of its inverse. Growth preserves graded protection instead of converting the mask to a binary image.
8 Growth examples
[hide]
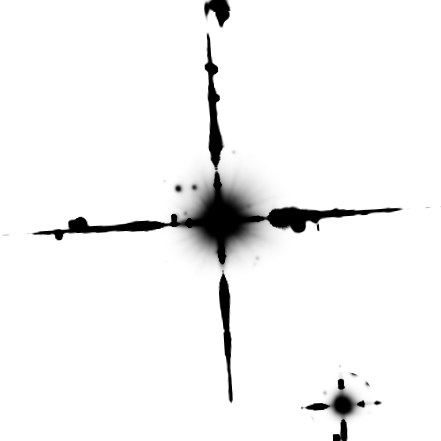
These crops show the same star region with 0, 2 and 5 pixels of growth. Star selection, core radius and all other settings are identical, with blur disabled. Compare the widths of the spike sides and the extent of the central protection.
Move the pointer over a growth value to compare these images in place.
9 Save and reuse settings
[hide]
Choose the source and settings, then drag the triangle onto an empty part of the workspace. Double-click the resulting process icon to open PixInsight's Script panel and click its blue Apply Global circle to reopen the mask dialog. Save the process icons or the project to retain them across sessions. Keep the script at its installed location. The icon stores the parameters and source view identifier, not source pixels or the preview bitmap.
If the saved source is closed or renamed, select a source in the dialog. Dragging an instance onto a main image runs immediately on that image, using the stored settings and creating a separate mask. This execution mode leaves the result open without a save dialog; use File > Save As. Apply instances to full images, not PixInsight previews, so the output covers the entire target.
10 Troubleshooting
[hide]
Too many stars are selected: Increase Minimum bright-core area first. To restrict selection to clearer diffraction patterns, increase Required spike arms.
A desired star is missing: Reduce Minimum bright-core area. If the source is dark, lower Core luminance threshold. If the core qualifies but the arms are faint or clipped, reduce Minimum luminance contrast or Required spike arms.
The mask is too wide around the core: Reduce Core radius. If faint wings remain too extensive, increase Minimum luminance contrast. Inspect with growth and blur set to zero while adjusting the underlying profile.
Cores and spikes need more protection: Increase Grow protected area, starting at 2 pixels. Refresh the preview at 1:1.
Spike tips are cut short: Check the console for the maximum-length warning and increase Maximum spike length if needed. Lower Minimum luminance contrast to detect faint extensions. Growth adds a margin around the detected profile.
A control seems to do nothing: Area and arm count choose stars; they do not resize retained stars. Maximum length affects only spikes that reach the search limit. Manual angle is active only with automatic measurement off. Refresh the preview after any change.
A blurred spike looks gray instead of black: Reduce Whole-mask blur sigma. For a wider protected band, increase growth before adding blur.
No stars are selected: Reduce the area or luminance cutoffs. Check actual image brightness rather than its STF appearance. The script does not create an empty all-white mask.
The mask does not align with the target: Confirm that source and target have the same dimensions and alignment. Apply identical cropping, resizing and rotation to both.
A calculation needs to stop: Use Abort in the PixInsight Process Console. Partial output is closed on cancellation.
11 Suitable images and limitations
[hide]
Luminance is extracted using the source RGB working space; grayscale input is used directly. Color and image stretch affect the measured signal. Linear data generally requires adjusted thresholds or a stretched copy used for mask detection. The detector assumes two approximately perpendicular spike axes. Curved or unusually broad spikes, severe crowding, nebulosity, and stars lying on another star's spike can require manual correction. The transverse profile search is bounded to 12–32 pixels on each side of an axis. Frame-clipped stars have less evidence available, and growth cannot extend outside the image.
12 Applying and saving the mask
[hide]
Black protects the target from processing; white allows processing; gray gives partial protection. Apply the result with masking enabled and Invert Mask OFF. The mask is not applied automatically. Keep it geometrically aligned with the target. The output can be saved and reopened as XISF for use with any image having the same alignment.